Intro to Java: Section 1.2 - Hello World (part one)

Watch 1.2-1.3 Lecture Video
One of the most important aspects of any program is the ability to produce output on the screen. In this exercise you will create your first Java application - a very simple program that outputs one line of text reading "hello, world" to the screen. This is traditionally the first exercise you will do when learning any language.
Setting Up Eclipse
Begin by launching Eclipse. Whenever you open Eclipse it will ask you what directory you would like to use as your workspace. The workspace is the folder on your computer where all your Java projects' files will be stored. Be sure to pick a good location that you will remember and keep it backed up. If you intend on using only one workspace and leaving it in the same place, you may select the checkbox on the bottom of the dialog so you don't have to see it every time you open Eclispe.Set your workspace and click "OK."

There are a few default perspectives you can use in Eclipse to change how the views (windows within Eclipse) are arranged within the program. Any changes you make can be saved and used for later. The perspective we will be using for this series is the Java perspective. To ensure you're in the Java perspective, click "Window" in the menu, select "Open Perspective" and click "Java." If Java is not available select "Other" and then select Java from this dialog.

You should also make sure the toolbar is being displayed by selecting "Window" and clicking "Show Toolbar."
The Eclipse Interface
Your window should now look similar to this screenshot. This figure highlights some of the essential tools we will be using in Eclipse. Be sure to familiarize yourself with the locations of everything. If you want to move anything around, simply drag and drop the view from its top bar.
Create & Setup The Project
It is now time to create your first Java project. Navigate to "File," select "New" and click "Java Project." This will open the New Java Project dialog. There are lots of different settings to choose from, but the default settings should work fine.Name your project and click the finish button. By default, your project will be stored in its own folder within your workspace.

After creating the project it will appear in the package explorer. If you expand the project you will see that it contains a folder called src, this is where the source files will be stored. It is now time to create a package within the project.
Java packages are used to group related Java classes together. Java packages can be compressed into .jar files to improve download speed for users. By convention, package names are written in lower case with no spaces.
Right click the src folder, select "new" and click "package" to create the package. Name your package and click Finish.

Class names should be simple, contain no spaces, and the beginning of each word should be capitalized. This is known as CamelCase. Name your class "HelloWorld" and select the option to automatically create the main method. The main method of a Java class file can be thought of as the entrance to the program, where everything begins. Everything placed within this part of the class will be executed first when the program runs.

Structure of a Class File
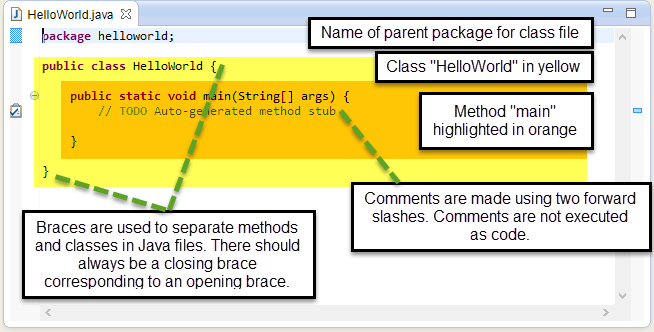
Now that the class has been created you can start coding. Your "HelloWorld.java" class file should look like the image above. All of the code displayed was automatically generated by Eclipse. The first line "package helloworld;" indicates that this file is a part of the helloworld package. Note that Eclipse has highlighted the word "package" in a reddish purple color. This coloring of code is known as syntax highlighting and it makes it easier for the code to be read. In this case, the word "package" is colored differently because it is a Java keyword. Java keywords are specific words reserved for use by Java. You should never use these words to name objects or files within Java because in most cases this will result in a compile error. A full list of the Java keywords is available on Oracle's documentation website here.
public class HelloWorldThe third line "public class HelloWorld" is the class declaration which indicates the start of the class. The closing curly brace at the end of the file indicates the end of the class. The name of the class, "HelloWorld," is referred to as the identifier of the class. Identifiers are a series of characters which may contain letters, digits, underscores, and dollar signs. Identifiers may not begin with a digit. Identifiers are also case sensitive, meaning that capitalization matters (e.g. "helloworld" is not the same as "HelloWorld").
The area highlighted in orange is the main method. This line is the method declaration:
public static void main(String[] args)The keywords public, static, and void will all be discussed in greater detail later in this series. For now, just recognize that you need these keywords to declare the main method. In the same way classes have identifiers, methods also have identifiers. In this case the method is identified as main. There must be a main method somewhere in the java application or the JVM cannot execute the program. Methods are declared using parenthesis following the identifier. Data can be passed to methods for processing. The types of input that a method can use is defined within the parenthesis. The purpose of "String[] args" will be discussed later.
Note that each section or block of code starts with an opening curly brace and closes with a closing curly brace. The area between the two braces is the body of that block. By convention each block of code is indented depending on its hierarchy within the program. The main method is a part of the HelloWorld class, so it is indented to indicate this. This indentation is not required but it makes the code much easier to read. If you wanted to, you could put an entire Java program on one very long line. If your indentations do not appear correctly, you can use the shortcut keys "Ctrl" + "Shift" + "F" in order to automatically indent your code within Eclipse.
// TODO Auto-generated method stubComments are made in Java using two forward slashes. Eclipse places TODO comments in automatically when it generates code. This simply means you need to write your own code in this location in order to get the program to work. You should delete TODO comments once you've begun coding in the area. You should use comments often when coding to explain what the code is doing in case you or someone else needs to edit the code later. You may create multiline comments using a single forward slash and an asterisk as is shown below.
/*
This is an example of a comment using multiple lines.
Anything typed within this comment is ignored by the compiler.
*/
Displaying Line Numbers
Displaying line numbers in Eclipse is something most programmers find helpful. To do this, right click on the gutter and select "Show Line Numbers." You may alternatively show line numbers by navigating to Window -> Preferences -> General -> Editors -> Text Editors -> Show line numbers.
0 comments:
Post a Comment